Percutaneous Tracheostomy Protocol
Purpose
To provide guidance on safe practices to perform percutaneous tracheostomy in the operating room and ICU settings.
Preprocedural Planning
- Indications for tracheostomy at the discretion of the attending surgical intensivist.
- The procedure should be scheduled through the operating room by calling OR Charge Nurse.
- Two Attending Physicians must present at bedside to safely perform the procedure. One provider with perform the tracheostomy and one will be managing sedation. A procedure note and a sedation note need to be completed upon completion of the tracheostomy.
- Bronchoscopic guidance is required
- Medications for the procedure consist of an anxiolytic, a narcotic pain medication, and a neuromuscular paralytic. Additionally, local anesthetic may be requested.
- An intubation/airway cart with associated equipment is required at the bedside should reintubation or emergent airway be needed.
Equipment
- Blue Rhino Percutaneous Tracheostomy Kit
- Cuffed Tracheostomy (Size 6 and/or Size 8)
- Sterile Drapes and Chlorohexidine Prep
- Sterile Gowns and Gloves
- Eye protection and Head Coverings
- Bronchoscope
- Sterile water and Lubrication
- Airway cart (associated supplies needed for reintubation if needed)
Team
- Attending Intensivist to perform the tracheostomy
- Attending Intensivist to manage sedation
- Trainees (ICU Fellows, Surgical Residents, Medical Students)
- Critical care Nurse
- Respiratory Therapist
- OR Nursing Staff
Room Set-up and Patient Positioning
- The patient should be positioned supine with the neck slightly hyperextended with a shoulder roll if possible. If there is concern for or confirmed cervical spine injury, inline stabilization with the neck in a neutral position must be maintained with securely placed tape.

- The patient’s arms should be placed at patient’s side to ensure access to the neck bilaterally. The bed needs to be positioned to allow for access to the head of the bed so that orotracheal reintubation can be performed if needed.
- For right-handed surgeons, the bronchoscopy cart is generally placed on the patient’s left with the person performing the tracheostomy on the patient’s right. The respiratory therapist should be at the head of the bed with easy access to the patient’s airway. A second provider will be at the head of the bed performing the bronchoscopy. The patient’s nurse needs to have easy access to the patients IV in order to administer medications in a timely manner and the monitor with vital signs and pulse oximetry with audio easily visible to all.

- Set the ventilator to deliver a set volume and rate with 100% FiO2 to preoxygenate the patient. The ICU monitor should set so the pulse oximeter is audible. Continuous hemodynamic monitoring should be achieved with ekg and arterial line or frequent BP cuff monitoring (every 3 minutes).
Technical Steps
- Prior to the start of the procedure, a through “timeout” should be performed. All members of the team should be present and attentive.
- Adequate sedation should be achieved with anxiolytic and narcotic pain medications. This is followed by paralysis.
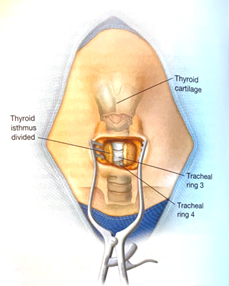
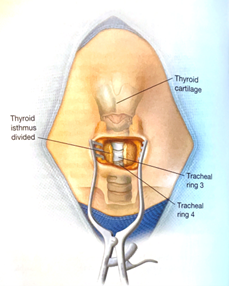
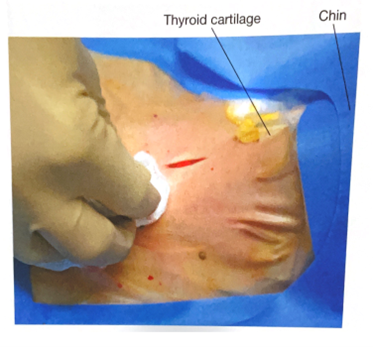
- Palpate the neck to identify relevant anatomy. Ideal location for placement of the tracheostomy is between the 2nd and 3rd tracheal ring.
- Don all appropriate PPE. Standard sterile surgical technique should be implemented.
- Surgically prepare neck and upper chest with chlorohexidine skin prep. Standard sterile technique and draping should be performed. Consideration for easy access to the endotracheal tube to allow for easy airway exchange after trach is placed.
- Anesthetize the skin and subcutaneous tissue with local anesthetic.
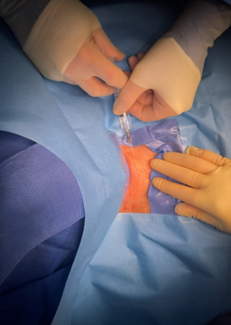
- Using a #15 scalpel, make a 2-3 cm vertical, midline incision approximately 40 mm cephalad (1-2 finger breaths) to the sternal notch and just below the cricoid cartilage. If an anterior jugular vein is encountered in the incision (even if no injury is suspected), consider ligation proximally and distally as this is easiest to perform before the tracheostomy tube has been placed.
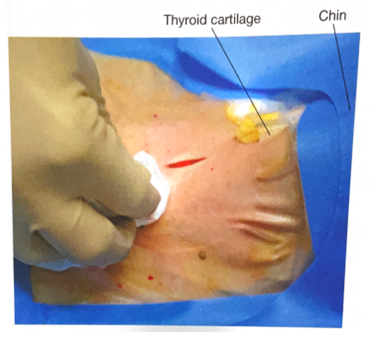
- Using a hemostat, bluntly dissect the subcutaneous tissue and muscle in midline to the pretracheal tissue along the length of the incision to better palpate the trachea to determine the point of entry.
- With the bronchoscope adaptor in place, advance the bronchoscope into the airway. Inspect the trachea and bronchial trees and clear any secretions.
- With the assistance of the respiratory therapist, while keeping the bronchoscope at the end of the endotracheal tube, retract both the endotracheal tube and bronchoscope simultaneously until the subglottic structures are visualized and one can see the anterior wall of trachea being palpated by the surgeon. The bronchoscope should be always kept within the endotracheal tube during this portion of the procedure in order to maintain control of the airway and ensure that the bronchoscope is not damaged.
- ***Although usually unnecessary, cautery may be used prior to entering the trachea with the introducer needle. After entry into the trachea, cautery should not be used do to the risk of fire with open oxygen source.***
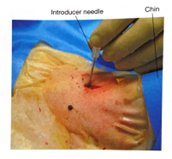
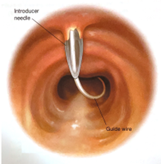
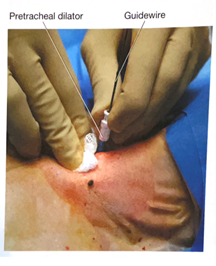
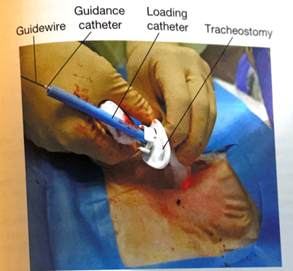
- An introducer needle is used the enter the anterior portion of the trachea between the 2nd and 3rd tracheal ring (approximately 1 finger breadth below the cricoid cartilage). With the bevel of the needle facing downward, the guidewire is passed into the trachea. Visualization of the guide wire going in the direction of the carina is required. Advance the guidewire slightly passed the carina into the right or left mainstem bronchus.
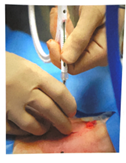
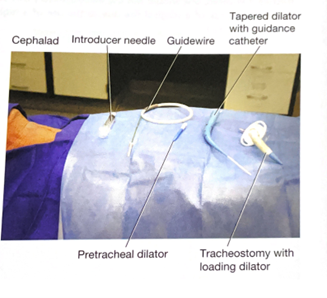
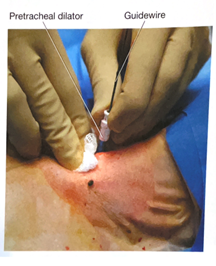
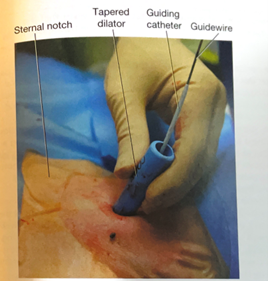
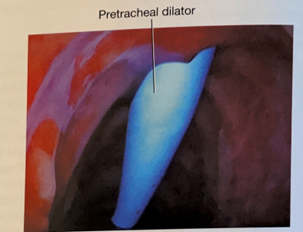
- Using the Seldinger technique, with constant Bronchoscopic visualization and control of the wire within the trachea, the trachea is sequentially dilated. The dilator handle is hydrophobic which makes it less likely to slip in a wet environment while the actual dilating portion is hydrophilic which only requires water/liquid to be lubricated. First the small tracheal dilator is advanced over the wire to dilate the pretracheal tract. Next the single-stage tapered dilator and the guiding catheter are advanced as a unit over the wire to dilate the trachea. Markings on the side of the progressive dilators guide the depth to which they are inserted. All catheters (pretracheal dilator, tapered dilator, and guiding catheter) should enter perpendicular to the trachea as to prevent pretracheal dissection or false passage. If the patient has limited ventilatory reserve prior to the procedure, the bronchoscope can be removed prior to the dilation portion of the procedure.


- The tapered dilator is removed from the guiding catheter and the guidewire, leaving the guiding catheter and the guidewire in place. If there is a longer distance between the tracheal surface and the skin surface, a finger can be used to dilatate the tract to help facilitate placement of the tracheostomy during the next step.
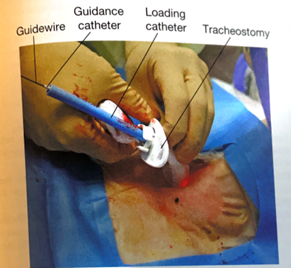
- Next, an appropriately sized and well lubricated tracheostomy tube with introducer is advanced over the wire and guiding catheter into the trachea. The wire, guiding catheter and loading trocar is then removed, keeping the tracheostomy in place.
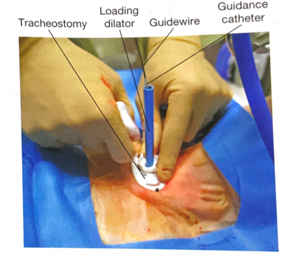
- Inflate the tracheostomy cuff, insert the inner canula and connect tracheostomy to ventilator circuit. The presence of end-tidal carbon dioxide after ventilation resumes confirms placement in the airway.
- A bronchoscopy should be performed through the newly placed tracheostomy to visually confirm that it is within the trachea in proper position. Only remove ET tube after placement of tracheostomy tube within the trachea is confirmed.
- The tracheostomy is secured with a tracheostomy collar or ties to help prevent accidental dislodgement and provide time for adequate to tract formation.
- Obtain a chest x-ray to confirm appropriate positioning of the tracheostomy tube, rule out pneumothorax, and evaluate for bronchial obstruction.


Tracheostomy Care
- Following tracheostomy placement, standardized tracheostomy care bundles should be implemented. These protocols include steps to ensure the tracheostomy is secure, suctioning techniques, daily stoma hygiene and knowledge of emergency protocols should the newly placed airway be compromised. Special attention should be given to prevent pressure ulceration, particularly along the inferior aspect of the tracheostomy faceplate, especially if the flange is sutured to the skin.
- The tracheostomy tube should be exchanged no sooner than post-operative day 7.
- Once the patient is liberated from the ventilator and secretions are reasonably managed the process of tracheostomy tube downsizing can occur. The downsizing if the tracheostomy tube allows for improved patient comfort and the ability to participate in speech therapy.
- After the tracheostomy is no longer necessary, the patient can be decannulated. The stoma is covered with sterile occlusive dressing generally closes within two to four days.
Key Contributors
Bennett Berning, MD
Last Updated
March, 2023
References
- Cheung NH, Napolitano LM. Tracheostomy: epidemiology, indications, timing, technique, and outcomes. Respir Care. 2014 Jun;59(6):895-915; discussion 916-9.
- Young D, Harrison DA, Cuthbertson BH, Rowan K, TracMan Col- laborators. Effect of early vs late tracheostomy placement on survival in patients receiving mechanical ventilation: the TracMan randomized trial. JAMA 2013;309(20):2121-2129.
- Holevar M, Dunham JC, Brautigan R, Clancy TV, Como JJ, Ebert JB, Griffen MM, Hoff WS, Kurek SJ Jr, Talbert SM, Tisherman SA. Practice management guidelines for timing of tracheostomy: the EAST Practice Management Guidelines Work Group. J Trauma. 2009 Oct;67(4):870-4.
- Delaney A, Bagshaw SM, Nalos M. Percutaneous dilatational tracheostomy versus surgical tracheostomy in critically ill patients: a systematic review and meta-analysis. Crit Care 2006;10(2):R55.
- Hashimoto DA, Axtell AL, Auchincloss HG. Percutaneous Tracheostomy. N Engl J Med. 2020 Nov 12;383(20):e112.
- Hawn, M. T., Berning, B. J., & de Moya, M. A. (2023). Tracheostomy: Open and Percutaneous. In Operative techniques in surgery (2nd Edition, Vol. Volume Two, pp. 2506–2512). Wolters Kluwer.